Chapter 10. Data-bound Forms
Contents
10.1 BuildForm Method Revisited
The appearance of an AspGrid-based data-bound form is completely customizable. You provide your own HTML layout for the form, and AspGrid takes care of individual form items.

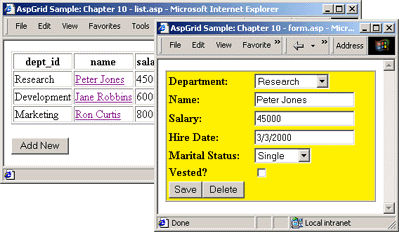
The code sample http://localhost/aspgrid/10_forms/list.asp. generates a list of employees with the names turned into hyperlinks pointing to the file \Samples\10_forms\form.asp. This ASP file displays a selected record as a data-bound form which allows you to edit and delete it.
10.2 Code Analysis
"<A HREF=""form.asp?id={{id}}"">{{name}}</A>"
We have seen a similar call to the AttachExpression method in the Chapter 7. Here, we turn the "name" field into a hyperlink pointing to the file form.asp, and pass the record ID as a parameter. The script in form.asp will use this parameter to construct a SELECT statement that returns a single record as we are about to see.
Besides the standard ASP code, the page list.asp also contains a button that switches our form into the "Add New" mode. This enables us not only to edit existing records but also add new ones via a form.
<INPUT TYPE="HIDDEN" NAME="AspGridAdd1" VALUE="1">
<INPUT TYPE="SUBMIT" VALUE="Add New">
</FORM>
Let us now examine the code in form.asp:
' Build connection string to aspgrid.mdb
strConnect = "DRIVER={Microsoft Access Driver (*.mdb)};DBQ=" & Server.MapPath("..\db\aspgrid.mdb")
' Create instance 2 of AspGrid for the Employees table
Set Grid = Server.CreateObject("Persits.Grid")
' Connect
Grid.Connect strConnect, "", ""
' Specify SQL statement
Grid.SQL = "select id, dept_id, name, salary, hiredate, maritalstatus, fullyvested from employees"
If Request("id") <> "" Then Grid.SQL = Grid.SQL & " where id=" & Request("id")
' Hide identity column
Grid("id").Hidden = True
' Use regular gray buttons
Grid.UseImageButtons = False
' Attach a lookup table to dept_id column
Grid("dept_id").AttachForeignTable "select id, name from departments", 1, 2
' Specify default value
Grid("hiredate").DefaultValue = Date()
' Specify a list of options
Grid("maritalstatus").Array = Array("Single", "Married", "Divorced")
Grid("maritalstatus").VArray = Array(3, 2, 1)
' DB values
' Display this field as a check box in edit mode
Grid("fullyvested").AttachCheckbox "Yes", "No"
' Specify location of button images
Grid.ImagePath = "../images/"
' Make the id parameter persistent
Grid.ExtraFormItems = "<INPUT TYPE=HIDDEN NAME=id VALUE=" & Request("id") & ">"
' Display grid
Grid.BuildForm
' Redirect if Delete button was pressed.
If Request("AspGridDelete1") <> "" Then Response.Redirect "list.asp"
' Also redirect if the Save button was pressed
If Request("AspGridSave1") <> "" Then Response.Redirect "list.asp"
' Also redirect if the Cancel button was pressed
If Request("AspGridCancel1") <> "" Then Response.Redirect "list.asp"
If Request("AspGridAdd1") = "" Then
Set Row = Grid.Output.Rows(1)
' first row
Else
Set Row = Grid.Output.FooterRow
' footer row for a new record
End If
%>
<HTML>
<HEAD>
<TITLE>AspGrid Sample: Chapter 10 - form.asp</TITLE>
</HEAD>
<BODY>
<% = Row.Form %>
<TABLE BORDER="1" CELLPADDING="0" CELLSPACING="0" WIDTH="300">
<TR><TD BGCOLOR="#FFEE00">
<TABLE BORDER="0" CELLPADDING="0" CELLSPACING="3" WIDTH="100%">
<TR>
<TD><B>Department:</B></TD>
<TD><% = Row(1).Value %></TD>
</TR>
<TR>
<TD><B>Name:</B></TD>
<TD><% = Row(2).Value %></TD>
</TR>
<TR>
<TD><B>Salary:</B></TD>
<TD><% = Row(3).Value %></TD>
</TR>
<TR>
<TD><B>Hire Date:</B></TD>
<TD><% = Row(4).Value %></TD>
</TR>
<TR>
<TD><B>Marital Status:</B></TD>
<TD><% = Row(5).Value %></TD>
</TR>
<TR>
<TD><B>Vested?</B></TD>
<TD><% = Row(6).Value %></TD>
</TR>
<TR>
<TD COLSPAN=2><% = Row(7).Value %></TD>
</TR>
</TABLE>
</TD></TR>
</TABLE>
<% = Row.CloseForm %>
</BODY>
</HTML>
The following two lines build a SELECT statement that returns a single record using the id variable passed as a parameter from list.asp:
If Request("id") <> "" Then Grid.SQL = Grid.SQL & " where id=" & Request("id")
The following line switches AspGrid to regular gray control buttons rather than images. This does not mean, however, that data-bound forms cannot use image buttons - they can.
The following line makes the id variable persistent within the page form.asp:
The very next line builds the form and populates the Grid.Output collection:
The following three lines perform re-direction back to list.asp if the Delete, Save, or Cancel buttons are pressed. It is important to place redirection code after Grid.BuildForm, or no changes will make it to the database.
If Request("AspGridSave1") <> "" Then Response.Redirect "list.asp"
If Request("AspGridCancel1") <> "" Then Response.Redirect "list.asp"
The following lines retrieve a Row object from the Output collection that will supply individual elements for our form. If form.asp was invoked via a hyperlink on the list.asp page, it means we are in the "edit" mode, and we must use the first row of the output's body. The first row contains form items for the selected record. Note that due to the way we built our SQL SELECT statement, the first row in the body also happens to be the only one.
If form.asp was invoked by clicking on the "Add New" button on the list.asp page, Request("AspGridAdd1") is non-empty and we must use the footer row. This row contains empty form controls which enable us to add a new record.
Set Row = Grid.Output.Rows(1)
Else
Set Row = Grid.Output.FooterRow
End If
Once the correct Row object is obtained, we may use its components to build our form. The <FORM> tag itself is returned by the Row.Form property, and the matching closing tag by Row.CloseForm. Therefore, our form is enclosed within the statements
and
To obtain the form element for the Department field, we query the Value property of the first Block in the Row.Blocks collection, as follows:
Since Blocks is Row's default property, we use an abbreviated form:
The form elements for the fields Name, Salary, HireDate, MaritalStatus and FullyVested are obtained via Row(2).Value to Row(6).Value, respectively.
The last (7th) block of the row returns HTML code for the control buttons (Save/Delete or Add New/Cancel).

